Working with the Tree
- Introduction
- The structure of a tree
- Update a collection after drag-and-drop (order)
- Access to objects in the tree
Introduction
This topic deals with the handling of the widget ObjectTree.
The main focus is on building a tree (SetFormat), drag and drop with update of the object (AdjustStructure / AdjustCollection) using examples and source code.
The structure of a tree
| In order for a tree to display the data as desired (see picture on the right), special SetFormat statements must be made. To do this, you must know the structure of the data you want to display. In our example, we are dealing with tasks of the project planning part of ClassiX® (Trouble-Ticket-System). All tasks and their subtasks shall be displayed. The structure of the data is shown in Figure 2. If you record the data in this way, you basically already have the tree in mind that the system should display. But how do we achieve this? |  Picture 1: The tree, how it should look like... |
| The code snipplet 1 should answer this question. In the first line -normal- the definition of the tree is given. After that, the INITIALIZE gives the necessary SetFormat statements. First we want to have a bitmap that shows us the different types. For a project this is the folder symbol, for a task the bug symbol and for a sub-project a folder symbol with a bug on it. For this we define a "column", like a normal ObjectList. In this case the macro RfcBitmap is called there. Next, the status, consisting of No., priority and deadline, is to be displayed. We assemble this string in the macro GetAStateForTree. The status should be displayed in green. The third "column" finally represents the name of the object. So far the procedure is quite the same as with an ObjectList. The fourth SetFormat- statement, however, makes the difference. | 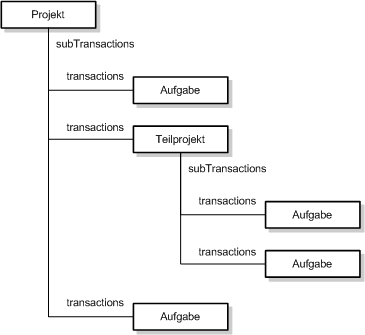 Figure 2: The data structure |
Code Snipplet 1:
ObjectTree(ItemTree, HIDDEN, ACCEPT_DROP, DRAG_COPY, NO_DRAIN, 7, 11, 530, 110)
[  INITIALIZE:
	  [ "CX_REQUEST::call(RfcBitmap)" ] SetFormat
	  [ "CX_REQUEST::call(GetAStateForTree)" COLOR GREEN ] SetFormat
	  [ "CX_REQUEST::shortName" "%-.90s" FIX_WIDTH(150) ] SetFormat
	  [ "CX_REQUEST::subTransactions" NODE ] SetFormat

]
Here we define that the objects from the collection in the subTransactions slot are to be used for the subordinate nodes (NODE). This allows you to map any structures.
But be careful: Recursions will abort at the appropriate point. Unless the IGNORE_RECURSION flag is used.
Updating a Collection after Drag and Drop
In the tree shown in picture 1, you can of course also change the order of the objects by dragging and dropping them. The problem is that these changes are not automatically written back to the corresponding collections (here: subTransactions). This must be done separately.
The commands AdjustStructure and AdjustCollection can be used for this purpose. With a tree, however, you should be careful here, because the AdjustCollection command only updates the top nodes (or the objects currently visible) of the tree. But if you have an object with subobjects somewhere in the tree, you destroy the original collection with AdjustCollection!
At this point the command AdjustStructure must be used. This name is a bit misleading, because it does not refer to structure objects (e.g. CX_STRUCTURED) but to the structure of an object in the tree. However, the BackRefName command must also be used to specify the back reference. Code snipplet 2 shows the code used for our example tree.
When using AdjustStructure, the problem of ambiguous NODE SetFormats also occurs (see AdjustStructure).
DROP:  -> objectsDropped
       -> objectSelected
       -> dropMode

       objectsDropped Dup Get(transaction) Dup if Unlink(subTransactions, transaction) else Drop
       objectsDropped objectSelected Dup if Link(subTransactions, transaction) else Drop
       objectSelected ReopenTree
       // do NOT use AdjustCollection here, it will only use the
       // top nodes as the subTransactions for the object
       objectSelected AdjustStructure
The drop command gives us three parameters on the stack:
- a vector of the dropped objects
- the object from which the drop was made
- a "Modus Operandi"
In this case a 0 objectsDropped GetElement -> objectsDropped is missing. It was in a longer case statement, which was removed here to save space (only for display here in the documentation).
Interesting is the last line with the AdjustStructure. The subTransactions of the selected object (objectSelected) and all subobjects are to be updated. This also updates the sequence within the subTransactions collection.
Access to objects in the tree
To refer to objects in the tree you can use the command Select. The object is then displayed in the tree with a blue background and is brought into the visible area if it was previously outside.
It should be noted that only objects known to the tree can be selected, i.e. those that can also be accessed using the GetCollection command. (If an item is expanded and then collapsed again directly, objects can also be accessed that are not visible but then become visible).
However, this functionality cannot be used if, for example, you want to insert a new position in a tree and then select it directly. In this case you have three options:
- If you know the position in which the new position is to be inserted, you can simply expand the position one step further. (Application example: You select a position in the tree and say "insert" via the ContextMenu) baseItem Expand(, this)
insertedItem Select(, this) - An algorithm collects all higher-level positions and opens them one after the other from the top. Define(ExpandObjectInTree)In this example allocationTxn is the object which is to be displayed in the tree for selection. To expand the tree up to this point, all higher positions must be expanded. Thus, the do-loop loop is run recursively upwards and the higher positions found are expanded in reverse order (to the order in which they were collected).
Var(tmpVector) [] -> tmpVector
do
Dup ifnot { Drop break }
Dup tmpVector Insert
Get(transaction)
loop
tmpVector iterate { Expand(, this) }
;// expand all upto the object should be selected
allocationTXN ExpandObjectInTree
allocationTXN Select(, this) - Simply expand the entire tree and select the appropriate position.
-> However, under certain circumstances this can take a long time and can be very annoying for the user.
;)
;)
;)
;)
;)
;)
;)
;)